使用Tengine+Lua+GM实现图片自动裁剪缩放 一、应用场景
互联网电商网站( PC、移动)
大量不同需求的图片(同一个图片需要不同尺寸的缩略图)
两种策略生成缩略图
二、安装与配置 1、软件列表
2、依赖包和类库 1 2 3 4 5 6 7 # 使用阿里下载源 [root@localhost ~]# wget -O /etc/yum.repos.d/CentOS-Base.repo http://mirrors.ali yun.com/repo/Centos-7.repo [root@localhost ~]# yum makecache `报错`执行 rm-rf /var/run/yum.pid # 安装依赖包和类库 [root@localhost ~]# yum install -y libjpeg libjpeg-devel libpng libpng-devel giflib giflib-devel freetype freetype-devel
3、安装Lua (1)安装依赖 1 [root@localhost ~]# yum install -y readline readline-devel gcc gcc-c++ pcre-devel openssl-devel zlib-devel
(2)安装Lua(源码编译安装) 1 2 3 4 [root@localhost soft]# tar zxvf lua-5.3.1.tar.gz [root@localhost soft]]# cd lua-5.3.1 [root@localhost lua-5.3.1]# make linux [root@localhost lua-5.3.1]# make install
(3)安装LuaJIT(源码编译安装) 1 2 3 [root@localhost anzb]# tar zxvf LuaJIT-2.0.4.tar.gz -C /opt/soft [root@localhost soft]# cd LuaJIT-2.0.4 [root@localhost LuaJIT-2.0.4]# make && make install
(4)查看Lua版本 1 2 [root@localhost LuaJIT-2.0.4]# lua -v Lua 5.3.1 Copyright (C) 1994-2015 Lua.org, PUC-Rio
4、安装Tengine 进入Tengine源码目录,使用configure配置安装路径以及需要安装的模块
1 2 3 [root@localhost soft]# unzip tengine-master.zip [root@localhost soft]# cd tengine-master [root@desktop-dm818pf tengine-master]# ./configure --prefix=/usr/local/Tengine --dso-path=/usr/local/Tengine/modules --with-ipv6 --with-http_realip_module --with-http_gzip_static_module --with-http_stub_status_module --with-http_concat_module --with-http_lua_module --http-proxy-temp-path=/var/tmp/Tengine/proxy_temp --http-fastcgi-temp-path=/var/tmp/Tengine/fastcgi_temp --http-uwsgi-temp-path=/var/tmp/Tengine/uwsgi_temp --http-scgi-temp-path=/var/tmp/Tengine/cgi_temp --http-client-body-temp-path=/var/tmp/Tengine/client_body_temp --http-log-path=/var/log/Tengine/access.log --error-log-path=/var/log/Tengine/error.log
安装Tengine (源码编译安装)
1 [root@localhost tengine-master]# make && make install
配置tengine环境变量
1 2 3 4 5 [root@localhost tengine-master]# vim /etc/profile # 增加tengine的环境变量 export tengine_home=/usr/local/Tengine export PATH=$PATH:$tengine_home/sbin [root@localhost tengine-master]# source /etc/profile
启动tengine
1 2 3 4 5 [root@localhost Tengine]# ln -s /usr/local/lib/libluajit-5.1.so.2 /lib64/ [root@localhost Tengine]# mkdir -p /var/tmp/Tengine/client_body_temp [root@localhost Tengine]# nginx [root@localhost Tengine]# curl http://localhost
5、安装GraphicsMagic 安装依赖包和类库
1 2 3 4 5 6 7 8 9 10 [root@localhost Tengine]# yum install -y libjpeg libjpeg-devel libpng libpng-dev el giflib giflib-devel freetype freetype-devel [root@localhost soft]# tar zxvf GraphicsMagick-1.3.18.tar.gz [root@localhost soft]# cd GraphicsMagick-1.3.18 [root@localhost GraphicsMagick-1.3.18]# ./configure --prefix=/opt/soft/GraphicsM agick --enable-shared [root@localhost GraphicsMagick-1.3.18]# make && make install [root@localhost GraphicsMagick-1.3.18]# /opt/soft/GraphicsMagick/bin/gm version
6、配置Lua脚本文件 文件名:ImageResizer.lua
位置:/usr/local/Tengine/lua/ImageResizer.lua
权限:可执行
1 chmod 777 /usr/local/Tengine/lua/ImageResizer.lua
1 2 [root@localhost GraphicsMagick-1.3.18]# cd /usr/local/Tengine/lua/ [root@localhost lua]# vim ImageResizer.lua
文件内容:
1 2 3 local command = "/usr/local/GraphicsMagick/bin/gm convert " .. ngx.var.request_filepath .. " -resize " .. ngx.var.width .. "x" .. ngx.var.height .. " +profile \"*\" " .. ngx.var.request_filepath .. "_" .. ngx.var.width .. "x" .. ngx.var.height .. "." .. ngx.var.ext; os.execute(command); ngx.exec(ngx.var.request_uri);
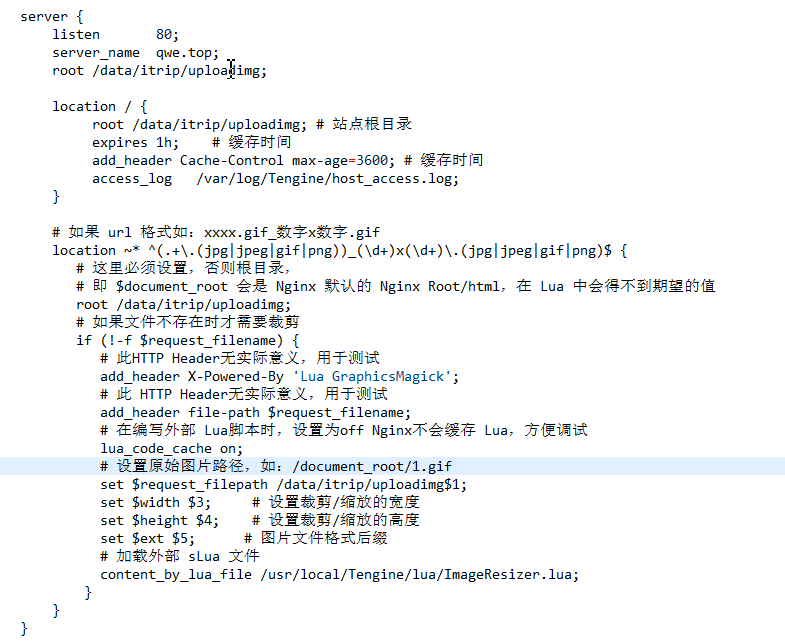
7、Tengine配置 文件名:nginx.conf
位置:/usr/local/Tengine/conf/nginx.conf
文件内容:
1 2 3 4 5 6 7 8 9 10 11 12 13 14 15 16 17 18 19 20 21 22 23 24 25 26 27 28 29 30 31 32 33 34 35 36 37 38 user root; # 新增一个server块 server { listen 80; server_name qwe.top; root /data/itrip/uploadimg; location / { root /data/itrip/uploadimg; # 站点根目录 expires 1h; # 缓存时间 add_header Cache-Control max-age=3600; # 缓存时间 access_log /var/log/Tengine/host_access.log; } # 如果 url 格式如:xxxx.gif_数字x数字.gif location ~* ^(.+\.(jpg|jpeg|gif|png))_(\d+)x(\d+)\.(jpg|jpeg|gif|png)$ { # 这里必须设置,否则根目录, # 即 $document_root 会是 Nginx 默认的 Nginx Root/html,在 Lua 中会得不到期望的值 root /data/itrip/uploadimg; # 如果文件不存在时才需要裁剪 if (!-f $request_filename) { # 此HTTP Header无实际意义,用于测试 add_header X-Powered-By 'Lua GraphicsMagick'; # 此 HTTP Header无实际意义,用于测试 add_header file-path $request_filename; # 在编写外部 Lua脚本时,设置为off Nginx不会缓存 Lua,方便调试 lua_code_cache on; # 设置原始图片路径,如:/document_root/1.gif set $request_filepath /data/itrip/uploadimg$1; set $width $3; # 设置裁剪/缩放的宽度 set $height $4; # 设置裁剪/缩放的高度 set $ext $5; # 图片文件格式后缀 # 加载外部 Lua 文件 content_by_lua_file /usr/local/Tengine/lua/ImageResizer.lua; } } }
创建站点目录:
1 mkdir -p /data/itrip/uploadimg
重启nginx:
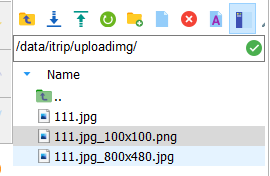
三、功能测试 上传图片到站点目录/data/itrip/uploadimg
1
2
3
[root@localhost data]# ll /data/itrip/uploadimg 总用量 168 -rw-r--r--. 1 root root 135979 10月 17 19:42 111.jpg
在浏览器地址栏输入一下内容:
1 http://localhost/111.jpg_100x100.jpg
自动在站点目录下生成以111.jpg为原图的800x400的缩略图。
1 2 3 4 [root@localhost data]# ll /data/itrip/uploadimg 总用量 180 -rw-r--r--. 1 root root 135979 10月 17 19:42 111.jpg -rw-rw-rw-. 1 root root 10323 10月 17 19:49 111.jpg_100x100.png